Sim-Diasca Installation Guide
Public Version

![]()
![]()
| Organisation: | Copyright (C) 2008-2025 EDF R&D |
|---|---|
| Contact: | olivier (dot) boudeville (at) edf (dot) fr |
| Author: | Olivier Boudeville |
| Creation date: | Monday, February 8, 2010 |
| Lastly updated: | Friday, July 18, 2025 |
| Version: | 2.4.8 |
| Status: | Stable |
| Website: | http://sim-diasca.com |
| Dedication: | For users installing the Sim-Diasca simulation engine. |
| Abstract: | This document will guide the reader through step-by-step instructions in order to install the Sim-Diasca simulation engine from its sources, which is the recommended procedure. |
Table of Contents
- Objective & Context
- Basic System-wide Network Settings
- Software Prerequisites
- Installing Erlang
- Installing LogMX
- Enabling the Python binding if needed: installing ErlPort
- Checking Which Tools Sim-Diasca Will Use
- Building Sim-Diasca
- Enabling The Distributed Mode Of Operation
- Testing Sim-Diasca
- Installing Sim-Diasca
- Credits
- Please React!
- Support
- Ending Word
Objective & Context
The goal here is to set up a fully functional Sim-Diasca installation, and to be able to test it and to develop with it, for example so that the implementation of new simulation cases and models can be directly experimented.
In the context of this public version, the installation will be performed:
- either from an archive (ex: Sim-Diasca-x.y.z.tar.bz2), supposedly already transmitted (typically after a request made through the contact form available at the official Sim-Diasca website (pointing, at the time of this writing, to this actual page)
- or from its official public repository
The operating system is supposed here to be GNU/Linux [3] (32 or, most probably, 64 bits):
(see the credits section about the comic strips)
| [3] | This is the platform we use routinely, although other UNIX systems and possibly Windows platforms could be targeted. Sim-Diasca is also quite close to be able to run on Mac OS X, when a few perks will be ironed out (e.g. /proc/cpuinfo replacement). Patches welcome! |
Root access is not necessary, but recommended so that any lacking prerequisite can be installed directly and with little effort:

Some space on disk will be needed. 300 megabytes should be enough for the full Sim-Diasca install by itself, but, depending on your use, generated data (e.g. frames for simulation videos, plots of simulation results) could need a lot more additional space.
Finally, in all cases, i.e. even in the context of simulations to be run on a single machine (rather than in a distributed mode), the network configuration (on all hosts involved) must be adequate (notably so that any switch to a distributed mode of operation is as painless as possible).
Basic System-wide Network Settings
Recommended Rules
We observed in a few cases less-than-optimal network configurations (see also issues #3 and #4 in the Most Common Issues section of the Sim-Diasca Technical Manual); in short, if wanting to stay on the safer, UNIX-legit side (at least so that the Erlang VM can resolve consistently the local hostname), then ensure that (supposing this local hostname is meant to be hurricane):
- in /etc/hosts, for each name referring to the local host (hence in the 127/8 network, usually 127.0.0.1):
- if using a specific domain (let's suppose it is foobar.org), first the FQDN (Fully-Qualified Domain Name) shall be specified (as the official name), then only the hostname (hence as an alias)
- all names based on the localhost hostname shall come last, i.e. after all actual names that would be specified for the same local IP address
- in /etc/resolv.conf, if a domain is specified there (which seems the most suitable), then it must be the right one (i.e. foobar.org here)
More information:
- The Wikipedia entry for the /etc/hosts file
- Is your /etc/hosts file healthy?
Two typical examples of (IPv4) legit network configurations follow.
Example of a network configuration without a domain
We suppose here that no specified domain name applies.
Regarding /etc/resolv.conf:
domain localdomain
nameserver xx.xx.xx.xx
[...]
Regarding /etc/hosts:
127.0.0.1 localhost.localdomain localhost
::1       localhost
127.0.1.1 hurricane.localdomain hurricane
[...]
Example of a network configuration with a domain
Here a specific domain is to be specified.
Regarding /etc/resolv.conf:
domain foobar.org
nameserver xx.xx.xx.xx
[...]
Regarding /etc/hosts:
127.0.0.1 localhost.localdomain localhost
127.0.1.1 hurricane.foobar.org hurricane
[...]
Testing the current network configuration
To anticipate a bit (one may come back to this point later), one may try to check whether the current network settings have a fair chance of being correct.
Supposing the FQDN of the localhost is hurricane.foobar.org and that Erlang is already available, one may run:
$ erl -name my_test
It shall result in a prompt like:
Erlang/OTP 23 [erts-11.1.4] [source] [64-bit] [smp:8:8] [...]

Eshell V11.1.4  (abort with ^G)
(my_test@hurricane.foobar.org)1>
The key being that the Erlang node name is my_test@hurricane.foobar.org indeed; for example, neither my_test@hurricane nor my_test@hurricane.acme.com.
Software Prerequisites
This installation procedure is quite detailed and takes into account different cases. Applying it should not be too difficult or time-consuming, and anyway it just needs to be done once; upgrading the Sim-Diasca version will then be transparent afterwards.
Some best-effort support is generally available by email (see contact address at the top of this document), should an issue be encountered.
We preferred to list below the widest possible range of tools here. This includes:
- the UNIX basics (e.g. grep, awk, sed, etc.); your distribution is expected to provide them out of the box
- the software of which the simulation engine itself is composed (e.g. the Erlang runtime, the various intermediate layers)
- the third-party tools that most simulators may trigger for their own purpose (e.g. LogMX to monitor and browse simulation traces, gnuplot to render plots - one should ensure that its PNG support is enabled, possibly thanks to libgd - or graphviz to render graphs)
- the other tools that, depending on the use cases, may be relied upon in order to post-process or make use of the simulation results (e.g. mplayer, to display generated videos)
- finally, the toolchain that can be used to build the simulation engine and its dependencies (e.g. to recreate the Sim-Diasca trace parser based on LogMX)
Software Needed
Software prerequisites for a given host (computer) depend on the role of this host.
One must indeed distinguish here between two kinds of nodes (in the sense of Erlang) involved in a Sim-Diasca simulation:
- the (single) user node, from which the simulation is launched and run, and to which results are retrieved and potentially displayed; there must be exactly one user node per simulation
- the (potentially numerous) computing nodes, which are in charge of the evaluation of all model instances and provide the resources needed by a parallel and distributed simulation; there must be at least one computing node per simulation (which is by default created on the same host as the user node)
These nodes are mapped to actual networked hosts (workstations, computers involved in a cluster, etc.). The current approach is to have exactly one computing node on each computing host (thus federating all local processors and cores thanks to Erlang), and have a user node that may or (rarely) may not be on the same host as one of the computing nodes.
So, typically, should just one computer be used, Sim-Diasca will then spawn (and run on) two (Erlang, local) nodes (the user node and one computing node).
Should a simulation be distributed over three hosts, by default the user host will run a user node and a computing node, whereas the two other hosts will each run one computing node.
Tool List For the Computing Nodes
An host that is to run only a computing node needs only to have a recent-enough Erlang environment installed (according to the conventions detailed below).
If additional distributed services are enabled (typically probes, whose result generation is by default itself parallel and distributed), then of course their prerequisites shall be available also on the computing nodes (e.g. gnuplot being then needed on them also).
As these needs form a subset of the needs of a user node, please refer to the next section.
Tool List For the User Node
On the targeted host the specific tools listed below and tagged Mandatory must be available: if not readily available, the corresponding packages [4] ought to be installed.
Some hints about each tool are specified below the table. Afterwards, all installation procedures that are not trivial are described.
| [4] | The package names are the ones used by Debian-based distributions, including Ubuntu. Other distributions might use (often slightly) different names. |
| Tool Name | Corresponding Debian Packages | Tool Necessity | Purpose |
|---|---|---|---|
| Erlang | erlang (but not to be installed that way) | Mandatory | To generate and run Sim-Diasca. Installing Erlang from sources is strongly recommended (see below our script to automate that). |
| Myriad | (none) | Mandatory | Needed by Sim-Diasca. Myriad sources are already included in the Sim-Diasca ones, so nothing special is to be done for Myriad. |
| WOOPER | (none) | Mandatory | Needed by Sim-Diasca. WOOPER sources are already included in the Sim-Diasca ones, so nothing special is to be done for WOOPER. |
| Traces | (none) | Mandatory | Needed by Sim-Diasca. Traces sources are already included in the Sim-Diasca ones, so nothing special is to be done for Traces. |
| LogMX | (none) | Recommended | To monitor the simulation traces (this is the default trace supervision tool). |
| Gnuplot | gnuplot, gnuplot-nox or gnuplot-x11 | Mandatory | To generate plots of numerical data. |
| Dot | graphviz | Strongly recommended | To generate graph renderings. |
| GNU make | make | Mandatory | To build and use Sim-Diasca. |
| ErlPort | N/A | Optional (dataflow only) | Necessary if enabling the Python dataflow binding. |
| Python 3 | N/A | Optional (dataflow only) | Necessary if enabling the Python dataflow binding (obviously). |
| Java 8 | N/A | Later (dataflow only) | Necessary if enabling any (future) Java dataflow binding (obviously). |
| Mplayer / Mencode | mplayer | Optional | To encode and display generated videos. |
| Geeqie (was Gqview) | geeqie (formerly gqview) | Mandatory | To browse plots of time series and inspect generated frames. |
| Eye of Gnome | eog | Optional | To display generated images. |
| Emacs | emacs | Optional | To edit Sim-Diasca sources, preferably using the Erlang mode for that. |
| Nedit | nedit | Very optional | To edit Sim-Diasca sources with a dedicated WOOPER-aware syntax highlighting |
| Git | git | Optional | To be able to read and modify Sim-Diasca sources, depending on access options. |
| GCC | gcc | Recommended | Needed if building Erlang from sources (the general case). |
| Ant | ant | Optional | To build the Sim-Diasca Java Trace Parser for LogMX (if ever needed - probably not). |
| Java (Oracle version or OpenJDK) | default-jdk or default-jre | Optional | To be able to compile and run a Sim-Diasca-enabled LogMX parser (JRE usually sufficient, as the .class can be reused) |
| Docutils | python-docutils | Optional | To generate documentation files from RST (reStructuredText mark-up). |
| LaTeX and all | texlive | Optional | To generate PDF documentation. |
| Evince | evince | Optional | To display (possibly generated) PDF files. |
Package Walk-Through
Erlang and Sim-Diasca (including its Myriad, WOOPER and Traces layers) are of course needed and their installation is detailed in the next sections.
The use of a custom-built Erlang environment is strongly recommended, to be able to rely on an adequately-configured and up-to-date version [5]. Thus no need to install any distribution-specific prebuilt Erlang package [6], however the GCC compiler (or any similar C compiler) must be available so that the build of Erlang can be performed.
| [5] | In the past, some distributions shipped stripped-down versions of Erlang that happened to be incorrectly built (e.g. lacking some components). Nowadays some include versions of Erlang that are way too ancient to be conveniently used. The last stable version of Erlang is always the best bet, and the Sim-Diasca developments tend to stick to it (possibly using bleeding edge additions, thus often requiring recent-enough versions of Erlang). |
| [6] | It is even safer not to have any system-level installation of Erlang, so that no version mismatch can ever happen, despite potential mistakes made in the user shell settings (note that a runtime checking of all the actual Erlang versions in use by each distributed host is performed). Thus one may only install first the dependencies of Erlang, i.e. the ones listed by the "show dependencies" action for your distribution of choice. |
In the context of the evaluation of dataflow, some simulation actors, typically dataflow processing units, may be implemented in Python (precisely: Python3``), in which case the Python binding shall be enabled; for that, ErlPort is needed, as well a recent enough version of Python.
The same binding effort has been initiated, yet not completed, for Java (no extra dependency would be needed then, except of course Java itself, in its 8.0 version of newer).
Note
Please note that such bindings are meant to apply only in a dataflow context (i.e. for the specific API borne by the processing unit): these are not general-purpose, actor-level bindings. Even if developing such generic bindings would certainly be feasible, no sufficient need arose yet to trigger their development. Contributions welcome!
An image viewer, a PDF viewer and a video player are generally useful to browse Sim-Diasca outputs. Defaults are, respectively: Geeqie (geeqie, previously known as gqview), Evince (evince), and Mplayer (mplayer), but they can be replaced very easily, in Sim-Diasca code, by any counterparts that would be preferred [7].
| [7] | For that refer to the default tool section in myriad/src/utils/executable_utils.erl. |
Depending on the version of the Java Runtime Environment (JRE) which is available on the user host, the prebuilt Sim-Diasca trace parser may be directly used (this is generally the case), otherwise it will have to be rebuilt from its sources. In this latter (unlikely) case only, Ant and a Java SDK will be needed.
Docutils, LaTeX and all are only useful if wanting to be able to generate the documentation of Sim-Diasca, or PDF-based trace reports.
Git is needed only if using a repository (either EDF-internal or public) in order to retrieve the Sim-Diasca sources; otherwise of course sources could come from a released archive instead.
Note
If some actual development on Sim-Diasca, or with Sim-Diasca, was to be performed (beyond mere testing), then relying on a Git clone rather than on a source archive should be preferred, so that Sim-Diasca can be updated accordingly (and in both directions) with little effort.
The choice in terms of text editor is a matter of taste, any should be suitable (including Emacs or IDEs like Erlide, based on Eclipse).
Finally, users of Debian-based distributions (e.g. Debian 12 Bookworm) could just start with the following command to install a set of relevant packages (the main prerequisite ones and extra ones):
$ sudo apt-get install bzip2 coreutils build-essential \
  libncurses5-dev openssl libssl-dev libwxgtk3.2-dev   \
  libgl1-mesa-dev libglu1-mesa-dev libpng16-16         \
  python3-docutils eog evince gnuplot-x11              \
  geeqie graphviz uuid-runtime mplayer ant             \
  default-jre texlive python3
Note
On an headless server (with no GUI, like for some cluster hosts), gnuplot-x11 may be replaced with gnuplot-nox.
Preparing the Sim-Diasca sources
The sources of Sim-Diasca can be obtained either from a Git repository (recommended approach) or from an archive file. Both cases are detailed below.
Installation From the Sim-Diasca Public Git Repository
Unless you have access to the EDF-internal Sim-Diasca Git repository (which should then be preferred, as it contains more content, and is by design more recent), you can clone the public Git repository (which should be fine as well [8]), at the following location: https://github.com/Olivier-Boudeville-EDF/Sim-Diasca.
| [8] | Please tell us (typically thanks to the e-mail address at the top of this document) if ever the current public version seems to date back a bit too much, as we do not always update the public version once an internal one has been released. |
It can thus be obtained, typically from a GNU/Linux host, thanks to:
$ git clone https://github.com/Olivier-Boudeville-EDF/Sim-Diasca
Then a right branch or tag shall be selected, knowing that versions bear annotated tags now labelled as: sim-diasca-x.y.z-version.
The master branch is the main one, and contains the latest public version of Sim-Diasca that has been released, so most people will happily stick to this master branch.
Note
The public repository is not the actual one that is used to develop Sim-Diasca, yet pull requests or any interaction may be based on it; if appropriate, we will take care of any integration that would be useful, and such improvements are to benefit to the community as a whole, in the next public versions to be released afterwards.
Installation From a Sim-Diasca Archive
You should have been given a Sim-Diasca archive, probably corresponding to a stable version (e.g. Sim-Diasca-a.b.c.tar.xz, like in Sim-Diasca-2.2.11.tar.xz) or a release candidate version, in the form of Sim-Diasca-a.b.c-rcd.tar.xz (like in Sim-Diasca-2.2.11-rc3.tar.xz). In 2015 we stopped using Semantic Versioning to switch back to the plain old versioning scheme.
In a directory on which you have read/write access and enough space left, extract that Sim-Diasca archive, using a proper tar incantation:
For example:
$ tar xvf Sim-Diasca-a.b.c.tar.xz
This should create a root directory named Sim-Diasca-a.b.c which contains all the relevant sources, including various top-level directories (myriad, wooper, traces, sim-diasca, etc.).
From now on, non-absolute paths (e.g. mock-simulators/soda-test/...) must be understood as being relative to this root directory.
Installing Erlang
Sim-Diasca is essentially written in Erlang, thus as soon as it will have to run on a given host, it will require a proper Erlang environment to be available on this host beforehand.
This means that all the computing hosts that may be used in the context of a distributed simulation must have access to such an Erlang environment, with compatible versions. There are various ways of ensuring it, including the cases where:
- an appropriate Erlang environment is already built-in on the host operating system
- the hosts have access to some shared infrastructure (e.g. a distributed filesystem, like NFS) - it is generally the case with HPC clusters
- a dedicated installation is performed on each of them
Although older versions of Erlang were supported (initially starting from R12B-5, released on November 5, 2008), API and typing changes require now using Erlang versions that are considerably more recent. One may preferably rely on the latest stable version available, as it is both more robust and efficient, and this is the one that is used by the developers of the engine. This version was usually in the form RxBy, like R16B, and now is named typically as OTP 23.2 at the time of this writing. As the engine relies on some features introduced in OTP 23.0, this version, or more recent, shall be used.
Erlang will then be preferably built from sources, rather than be installed thanks to the package manager of the distribution at hand, in order to benefit from an unmodified cutting-edge stable version that additionally will be built with the finely-tuned configuration deemed the most appropriate in a Sim-Diasca context [9].
| [9] | We already saw very popular distributions attempting to split the Erlang environment into subpackages and ending up with a very non-functional software. |
Note
The libncurses development files (e.g. the libncurses5-dev package, for Debian-based distributions) are needed to build Erlang.
Similarly, the OpenSSL development files (i.e. the openssl and libssl-dev packages, for Debian-based distributions) are needed for the crypto Erlang module to be available, as we prefer to rely on better-quality random generation (in the future we may use Tiny Mersenne Twister - TinyMT, or a library dedicated to stochastic management).
Finally, newer Erlang graphical services rely on WxWidgets, whose packages (notably libwxgtk2.8-dev and their own prerequisites, libgl1-mesa-dev, libglu1-mesa-dev, libpng3 and g++) are preferably to be installed (needed for the wx and observer modules for example).
Therefore all these packages should be installed beforehand. Build tools, notably gcc and GNU make, should be available as well.
So, to obtain a proper Erlang installation, users of Debian-based distributions may run the following command (in one line):
$ sudo apt-get install g++ make libncurses5-dev libssl-dev libwxgtk3.2-dev \
  libgl1-mesa-dev libglu1-mesa-dev libpng16-16
For such an installation from sources, in the myriad/conf directory of the Sim-Diasca codebase a script named install-erlang.sh is provided [10].
| [10] | Also available at install-erlang.sh. |
If you have a direct connection to the Internet, it can automatically download the Erlang sources, and then build and install them appropriately; otherwise, typically if being behind a proxy, one may download first by oneself the relevant archives (namely OTP x.y Source File and OTP x.y HTML Documentation File) from here.
You can then either run the installation script "as is" (with or without a prefix being specified as parameter) or, if preferred, modify its settings appropriately beforehand, or just get inspiration from it instead and then install Erlang directly from the shell.
install-erlang.sh --help will provide more usage information, notably on whether it should be run as root or not, installed in a prefixed directory or in the system tree, with a selection of options (e.g. to prevent any attempt of downloading said archives), etc.
From a well-chosen, separate directory (e.g. ~/Software/Erlang, to avoid mixing the sources of Erlang with the ones of Sim-Diasca), one could run [11] for example:
$DIR/myriad/conf/install-erlang.sh
| [11] | Just ensure that any pre-dowloaded archives are available from that directory. |
or, if a specific installation prefix is to be used:
$DIR/myriad/conf/install-erlang.sh /opt/my-tools-repository
Note
One should not execute this script directly from its containing directory (myriad/conf); instead the script shall be run from outside any build tree related to Sim-Diasca - a safe, recommended choice being ~/Software/Erlang [12].
| [12] | Otherwise, as the Erlang source archive is extracted in the current directory of the install script, the full build tree of Erlang (typically named otp_src_x.y) would end up in myriad/conf. Then, at deployment time, when Sim-Diasca scans recursively the build trees of its prerequisite layers (namely, from bottom-up: Myriad, WOOPER and Traces; note that for convenience they are already integrated into the distributed Sim-Diasca codebase) in order to gather their BEAM files in its simulation package, it would select unnecessarily all the ones of Erlang itself as well (whereas they are expected to already be installed in each node) - leading for example to drastically longer deployment durations, very large simulation archives typically ending up with deployment time-outs. A mechanism has been added in order to detect such cases. |
In all cases, you should end up with an installed version of the latest stable source of Erlang.
Sim-Diasca developers could prefer installing automatically this version, along with its associated documentation, in an ad hoc software repository (e.g. ~/Software/Erlang/), where successive versions of the tools would be installed over time (it is quite convenient to switch versions).
The simplest and recommended approach is to run the installation script directly from such any software repository of choice (not located within the Sim-Diasca codebase), and to add the --doc-install option in order to obtain the documentation as well, like in:
$ mkdir -p ~/Software/Erlang
$ cd ~/Software/Erlang
$ $DIR/myriad/conf/install-erlang.sh --doc-install
Let's call V the Erlang version number selected by the script (e.g. V=23.2).
The actual installation directory will then be:
- if no prefix was specified (recommended case):
- if the install script is run as root (not recommended), Erlang will be directly installed in /usr/local
- otherwise (recommended): in ~/Software/Erlang/Erlang-$V
- if a prefix PREFIX was specified, installation will be done in PREFIX/Erlang/Erlang-$V
To allow for any later recompilation (e.g. should some options be changed), if no prefix was specified and if the installation script is not run as root, the Erlang build tree (otp_src_x.y) is not removed after the installation. Should the current directory (whence the user ran the installation script) be located within the build tree of any part of Sim-Diasca, the corresponding otp_src_x.y directory must be removed by the user, so that the Erlang BEAM files cannot be mixed up with the ones of that layer. In other cases, one may or may not prefer removing the OTP build tree or even the Erlang archives (typically otp_*_x.y.tar.gz).
If intending to make any actual development in the future (e.g. writing a specialized simulator, adding models or operating on the Sim-Diasca code itself), one should add the --generate-plt option to the install-erlang.sh command-line. It will pre-process Erlang files to generate a PLT file that will be later reused by the Dialyzer tool for code analysis. Please refer to the Using Type Specifications With Sim-Diasca section of the Sim-Diasca Developer Guide for further information.
Running the installation script should create, in the target installation directory, two corresponding sub-directories, Erlang-$V and Erlang-$V-documentation, containing respectively the Erlang runtime and its corresponding documentation, if it was selected.
Additionally, in this installation directory two symbolic links (Erlang-current-install and Erlang-current-documentation) will also be automatically created or updated, to point to these newly installed directories, so that one can register in one's settings files (e.g. ~/.bashrc) appropriate paths referring to these links: further Erlang updates will then not require the user to update his settings, while prior installed versions will remain available through the use of their full path.
So one may end up with a directory layout like:
$ tree -L 1 -d ~/Software/Erlang/
/home/dalton/Software/Erlang/
|-- Erlang-R14B
|-- Erlang-R14B-documentation
|-- Erlang-R16B
|-- Erlang-R16B-documentation
|-- Erlang-23.2
|-- Erlang-23.2-documentation
|-- Erlang-current-documentation -> Erlang-23.2-documentation
`-- Erlang-current-install -> Erlang-23.2
In the general case (i.e. unless run as root with no prefix specified), the new Erlang environment will be installed in a prefix, thus probably it will not be readily available from the shell. As a consequence one should ensure that the Erlang compiler (erlc) and the corresponding interpreter (erl) [13] can be found directly from the PATH (both are in the same directory).
| [13] | The Erlang compiler transforms Erlang code (in *.erl/*.hrl files) into BEAM bytecodes (*.beam) suitable for the Erlang Virtual Machine. They can then be executed by the Erlang interpreter. |
For example, directly from a bash shell:
$ export PATH=~/Software/Erlang/Erlang-current-install/bin:$PATH
$ cd ~
$ type erl
erl is /home/dalton/Software/Erlang/Erlang-current-install/bin/erl
Setting also the relevant path, one time for all (rather than on a single short-lived terminal) in the shell configuration of the user (e.g. ~/.bashrc) is mandatory for further uses as well; as a consequence, please add the relevant export in the configuration file of your shell of choice.
Finally, two simple tests allow to ensure that Erlang can run flawlessly in this new environment. The first one allows to check that we are using the expected version and that it can indeed be run (you have to enter CTRL-C twice to close the Erlang shell afterwards):
$ cd
$ type erl
erl is /home/dalton/Software/Erlang/Erlang-current-install/bin/erl
$ erl
Erlang/OTP 23 [erts-11.1.4] [source] [64-bit] [smp:8:8] [ds:8:8:10] [async-threads:10] [hipe] [kernel-poll:false]

Eshell v11.1.4  (abort with ^G)
Second test allows to check that your network configuration allows to run a networked Erlang virtual machine with long names (enter again CTRL-C twice to exit):
$ erl -name this_is_a_test
Erlang/OTP 23 [erts-11.1.4] [source] [64-bit] [smp:8:8] [ds:8:8:10] [async-threads:10] [hipe] [kernel-poll:false]

Eshell V11.1.4  (abort with ^G)
(this_is_a_test@foo.bar.org )1>
Refer to the Name Resolving section should this test fail.
Installing LogMX
LogMX is the default tool used here to monitor the distributed simulation traces (refer to the Ceylan-Traces website for more information on that layer).
Using this proprietary tool is fully optional: adding the command-line option CMD_LINE_OPT="--batch" will disable its automatic launching by the engine. As, however, we believe that being able to easily inspect the simulation traces is essential in order to make the best use of the engine, we recommend to install this tool.
Although its purpose is only to allow to supervise the Sim-Diasca traces, its installation requires quite a lot of explanations, especially to deal with the case where the Sim-Diasca parser for LogMX has to be rebuilt from its sources (this is generally not needed, though).
A prerequisite to running LogMX is to have the Java SE Runtime Environment installed on the user host, preferably the (free software) OpenJDK version.
Note
LogMX can accommodate older versions of Java. However, if planning to use the Sim-Diasca Java Binding, then Java version 8.0 or newer must be used.
For example, Java 7 could suffice for LogMX:
$ java -version
java version "1.7.0_111"
OpenJDK Runtime Environment (IcedTea 2.6.7) (Arch Linux build 7.u111_2.6.7-1-x86_64)
OpenJDK 64-Bit Server VM (build 24.111-b01, mixed mode)
Otherwise the Sun (Oracle) version could be used, like in:
$ java -version
java version "1.6.0_10"
Java(TM) SE Runtime Environment (build 1.6.0_10-b33)
Java HotSpot(TM) Client VM (build 11.0-b15, mixed mode, sharing)
If not available, either the package manager of the distribution [14] or this link for the Sun version should be used.
| [14] | Example: for Debian-based distributions, apt-get install openjdk-8-jdk or apt-get install sun-java8-jdk can be used; or, for Arch Linux, pacman -S jdk8-openjdk may be used. |
Note that if only the Java SE Runtime Environment (i.e. the JRE) is installed (instead of the Java SE Development Kit, i.e. the JDK), then Java code can be executed indeed, but not generated.
However both cases should work, since using a recent JRE should spare the rebuilding of the Sim-Diasca parser (and hence the use of the JDK).
Note
With some distributions (e.g. Ubuntu), the default JRE is headless (which means that the JRE does not provide the dependencies used for the graphical components). Fixing this issue is as easy as installing the missing dependencies (apt-get install openjdk-8-jre).
Getting LogMX
LogMX is a proprietary software, thus it cannot be found in package repositories. If not supplied by your organisation, it should be directly downloaded from that location, in its latest version, either the free Evaluation version or the Professional one (both of which can be used by Sim-Diasca).
Note
If you plan to make a commercial use of LogMX, then according to its licence you must purchase its quite inexpensive professional version. In this case all paths in the form of LogMX_vx.y.z should be translated into paths in the form of LogMX_vx.y.z_pro.
LogMX archive should be extracted, preferably in the same install directory as other tools.
For example:
$ mkdir -p ~/Software/LogMX
$ cd ~/Software/LogMX
$ cp ~/LogMX_vx.y.z.zip .
$ unzip LogMX_vx.y.z.zip
It must then be appropriately configured and linked to a proper Sim-Diasca parser, as shown below.
Setting Up LogMX
Configuration Files
Sim-Diasca provides, in the traces/conf/logmx directory, the following configuration files:
- logmx.properties
- managers.properties
- parsers.properties
They should be copied in the LogMX config directory. These files should overwrite the default LogMX ones. For example:
$ for f in logmx.properties managers.properties parsers.properties; do \
/bin/cp traces/conf/logmx/$f ~/Software/LogMX/LogMX_vx.y.z/config ;    \
done
Note
If you purchased the LogMX professional version, copy the license.properties file that you obtained in the LogMX config directory instead of the supplied one (and of course keep the other properties-related files).
The LogMX script must then be set to executable:
$ chmod +x ~/Software/LogMX/LogMX_vx.y.z/logmx.sh
Identically to Erlang, the LogMX script must be found from the path. For example, with a bash shell:
$ export PATH=~/Software/LogMX/LogMX_vx.y.z:$PATH
$ cd ~
$ type logmx.sh
logmx.sh is /home/dalton/Software/LogMX/LogMX_vx.y.z/logmx.sh
Setting also the relevant path in the shell configuration (e.g. ~/.bashrc) is recommended for further uses.
A best practise for that is to install all custom software in a base directory (e.g. ~/Software/), with a sub-directory for each tool (e.g. ~/Software/LogMX/). Then all successive versions of that tool could be installed here (e.g. ~/Software/LogMX/LogMX_v7.3.0/).
Finally, a symbolic link pointing to the latest current version could be defined when installing a new version of that tool (e.g. cd ~/Software/LogMX/; ln -sf LogMX_v7.3.0 LogMX-current-install).
That way, one just has to specify in one's shell configuration:
export PATH=~/Software/LogMX/LogMX-current-install:$PATH
This is thus done once for all, it will not have to be updated when upgrading LogMX.
LogMX should then be run "as is", to ensure that it has a chance to run later, when the Sim-Diasca parser will be plugged-in:
$ logmx.sh
After up to a few seconds, a LogMX window should successfully pop up. Then close that window.
Note
On some LogMX versions, running this logmx.sh script will output a line on the console complaining about a startup.conf file being not found, or printing [: 86: 1: unexpected operator and [: 86: 0: unexpected operator.
A simple solution is to edit logmx.sh and replace the STARTUP_CONF_FILE="startup.conf" line (around line 35) by STARTUP_CONF_FILE=/dev/null.
Setting Up the Sim-Diasca Trace Parser
Due to Java, this is probably the trickiest (optional, yet recommended) part of a Sim-Diasca install.
Using The Prebuilt Sim-Diasca Parser
In the traces/conf/logmx directory, there is a prebuilt Java class, CeylanTraceParser.class, a generic parser we developed for Sim-Diasca and other tools.
If the Java environment installed on the host is recent enough (which is very likely), then that class file will be directly usable, without further need of recompiling it.
Best option is to try to use it directly, and to rebuild the parser only if this fails.
That file should just be copied to the right location:
$ CLASS_DIR=~/Software/LogMX/LogMX_vx.y.z/parsers/classes/ceylan/parser
$ mkdir -p $CLASS_DIR
$ cp traces/conf/logmx/CeylanTraceParser.class $CLASS_DIR
Checking That The Sim-Diasca Parser Works Properly
To do so, just test, from the root of the sources, whether LogMX and the Sim-Diasca parser are correctly integrated, with a sample of Sim-Diasca traces:
$ logmx.sh traces/conf/logmx/TraceSample.txt
You can skip next section if you see something like:
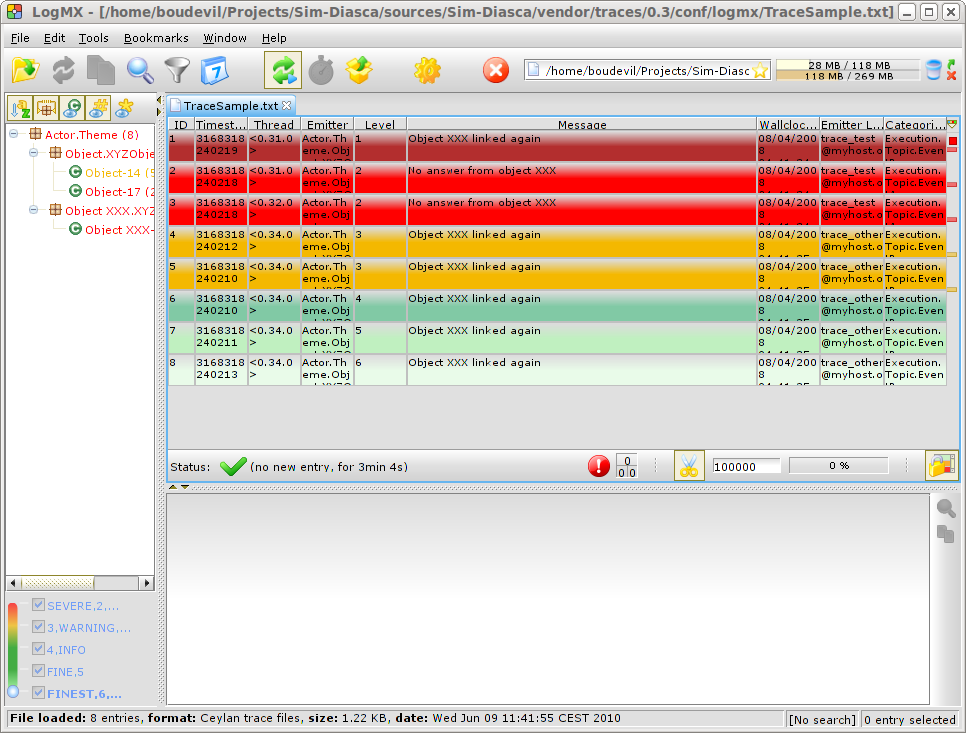
Otherwise, an error like Error while instantiating parser must have been reported: your Java environment is most probably not appropriate (too old?), and, if you are not able to upgrade the Java interpreter that you are using, then unfortunately the parser will have to be rebuilt with all the Java bells and whistles, as explained in the next section (usually this issue does not occur, and one can thus jump directly to the Checking Which Tools Sim-Diasca Will Use section).
Building The Sim-Diasca Trace Parser
The Java SE Development Kit (i.e. the JDK) and Ant are needed here.
They can be installed either thanks to the distribution, for example:
$ sudo apt-get install openjdk-8-jdk ant
   - or -
$ sudo apt-get install sun-java8-jdk ant
or they can be retrieved from their respective official sites (1, 2), if not directly built and installed from sources (for Ant).
Then the Sim-Diasca parser source file should be placed at the right location in the LogMX tree, and built:
$ PARSER_SRC_DIR=~/Software/LogMX/LogMX_vx.y.z/parsers/src/ceylan/parser
$ mkdir -p $PARSER_SRC_DIR
$ cp traces/conf/logmx/CeylanTraceParser.java $PARSER_SRC_DIR
$ cd ~/Software/LogMX/LogMX_vx.y.z/parsers
$ ant
Buildfile: build.xml
clean:
mkoutdir:
 [mkdir] Created dir: ~/Software/LogMX/LogMX_vx.y.z/parsers/classes
build-dev:
 [javac] Compiling 1 source file to ~/Software/LogMX/LogMX_vx.y.z/parsers/classes
BUILD SUCCESSFUL
Total time: 2 seconds
This should imply that CeylanTraceParser.class has been successfully built.
Test the result like explained before, in Checking That The Sim-Diasca Parser Works Properly.
Enabling the Python binding if needed: installing ErlPort
In the context of the evaluation of a dataflow, some simulation actors may be implemented in Python, in which case the (fully-optional) Python dataflow binding shall be enabled (see the USE_PYTHON_BINDING variable in myriad/GNUmakevars.inc for that). One should skip this section if not planning to use Python-based (dataflow) actors.
Python Configuration
Python 3 (3.5.2 or newer) is required here, and - as for the other runtime dependencies - must thus be available on the target system (i.e. on the user host and also on all additional computing hosts - if any).
Often, on a given host (typically a computing one), multiple generations of Python coexist (Python 2 or 3), as well as multiple versions thereof (e.g. 3.5.2, 3.6.3, etc.).
We leave the choice of the actual Python version to be used by the engine up to the developer, who can select it by creating a symbolic link named python-for-sim-diasca that should point to the Python version of interest, and be found from the default user PATH.
For example one may create such a symbolic link in a ~/Software/bin that would be declared in the PATH environment variable, like in:
$ mkdir -p ~/Software/bin
$ cd ~/Software/bin

$ ln -s ~/Software/Python/Python-3.6.3-current-install/bin/python3.6
          python-for-sim-diasca
  or
$ ln -s /usr/bin/python3 python-for-sim-diasca
Then ~/.bashrc would be updated with:
export PATH=~/Software/bin:${PATH}
ErlPort Installation
As this binding relies on ErlPort, this dependency must be installed beforehand. We currently rely on the original codebase (not on one of the forks thereof).
Our guidelines recommend that it is located in the ~/Software/ErlPort directory, and that an ErlPort-current-install symbolic link points to it.
Knowing that the actual installation directory must be named erlport [15], one should target a tree structure such as:
$ tree -L 1 ~/Software/ErlPort
/home/batman/Software/ErlPort
|-- erlport
`-- ErlPort-current-install -> erlport/
| [15] | Otherwise the interpreter initialization on the computing nodes would fail (with the {not_found,"erlport/priv"} error). |
To do so, one can issue the following commands:
$ ERL_PORT_BASE=~/Software/ErlPort
$ mkdir -p ${ERL_PORT_BASE}
$ cd ${ERL_PORT_BASE}
# Circumvent any proxy here.
$ git clone https://github.com/hdima/erlport.git
$ ln -s erlport ErlPort-current-install
$ cd erlport
# The SHA1 we currently rely on:
$ git checkout 246b77
Another option is to download the latest source version of ErlPort directly, as it is usually appropriate.
Then, depending on your version of Python 3.x, typically if it is in the 3.5-3.7 range, it may need a minor code change, located, from the erlport directory, in priv/python3/erlport/erlang.py [16].
| [16] | We have our own version of this file that should manage most, if not all, Python 3.x versions, to be found in the sim-diasca/src/core/services/bindings/python/ (just replace,in erlport/priv/python3/erlport, the original erlang.py with this one then). |
Indeed the line near the top reading as:
from inspect import getargspec
may have, for these very specific versions of Python, to be replaced with:
from inspect import getfullargspec
With the current versions of Erlang, another simple change is needed (in order to properly support stacktraces), in src/erlport.erl, according to following diff:
-        Type:Reason ->
-            Trace = erlang:get_stacktrace(),
-            {error, {erlang, Type, Reason, Trace}}
+        Type:Reason:StackTrace ->
+             {error, {erlang, Type, Reason, StackTrace}}
Then, still from the erlport root directory, one may run: make to enable the Python support.
Note
We supposed above that ErlPort was to be installed in ~/Software/ErlPort/erlport.
Should another convention be preferred, then the ERLPORT_BASE_DIR environment variable shall be defined in order to point to the actual directory to use.
So, as an example, one may add in one's ~/.bashrc the following line: export ERLPORT_BASE_DIR=/opt/ErlPort/erlport.
To test the proper Python support, one should refer to the Sim-Diasca Dataflow HOWTO document.
Checking Which Tools Sim-Diasca Will Use
It is mandatory to have Sim-Diasca know where the tools it needs can be found. To check which main tools would be used, run from the sim-diasca directory:
$ make info-tools
ERLANG_INTERPRETER = ~/Software/Erlang/Erlang-current-install/bin/erl
ERLANG_COMPILER = ~/Software/Erlang/Erlang-current-install/bin/erlc
LOGMX = ~/Software/LogMX/LogMX-current-install/logmx.sh
Some tools will be only used by this make system, whereas others, the majority of them (e.g. the Erlang interpreter and compiler) will be used by the simulator as well.
Therefore the path to the former ones could be set directly in the makefiles only. However it is generally more convenient that the latter ones are found directly from the shell environment, so that both the Make system and the simulator will find them with the same correct versions.
If a make-only tool is lacking, edit the GNUmakevars.inc file of the relevant package (e.g. the one of myriad, wooper, traces, sim-diasca, etc.) accordingly.
If another tool is lacking, then the shell environment should be updated. This involves updating - most preferably, once for all - the PATH environment variable.
This can be done by adding PATH=/a/path/to/a/lacking/tool:$PATH to the shell init file (e.g. ~/.bashrc) and sourcing it again (. ~/.bashrc).
Re-run make info-tools and apply changes until the make system selects the exact tool versions you want.
Building Sim-Diasca
The good news is that Sim-Diasca is written in Erlang, thus it requires to be compiled:
The bad news is that it will not take long, only up to a few minutes, as it is itself parallel on each package.
It is just a matter of running make from the Sim-Diasca source root, i.e. its base directory, which contains the myriad, wooper, traces, etc. directories.
If using a clone, go to this root typically by entering cd sim-diasca-clone. If using a file release, it will be: cd Sim-Diasca-clone.
Then:
$ make all
Building all, sequentially, in [..]/Sim-Diasca-clone
Building all, in parallel over 8 cores, from [..]/myriad
Building all in [..]/Sim-Diasca-clone/myriad/contrib
Building all in [..]/Sim-Diasca-clone/myriad/src
           Compiling module hashtable.erl
           Compiling module hashtable_test.erl
           Compiling module hashtables_comparison_test.erl
[...]
Building all, in parallel over 8 cores, from [..]/wooper
[...]
Building all, in parallel over 8 cores, from [..]/traces
[...]
Building all, in parallel over 8 cores, from [..]/sim-diasca
[...]
Building all, in parallel over 8 cores, from [..]/mock-simulators
[...]
Then you should have a version of Sim-Diasca properly built, and fully able to run, locally or not.
However, should multiple computing hosts be used, a few system-level checks shall be performed first, to ensure that the distributed mode of operation is correctly enabled - as discussed in the next section.
Just before, a note about what we believe is a rather common network misconfiguration of too many Linux computers, which may impact even local, single-host simulations [17]: one should ensure that, if FQDN hostnames are associated to IPs for the local host in /etc/hosts (e.g. 127.0.1.1 hurricane.foobar.org hurricane), their domain matches the one (if any) specified in /etc/resolv.conf.
Often one can see there domain localdomain (instead of, say, domain foobar.org), which may lead to resolve the local FQDN as hurricane.localdomain instead of hurricane.foobar.org (which may be a problem at least for the Erlang VM).
| [17] | The network configuration still plays a role even in a non-distributed mode of operation, as the user node is to launch, on that same given host, a computing node, and this spawned one is to connect back to the user node by designating it with either just a node name (e.g. my_user_node) or with a node name and a (local, here) hostname (e.g. my_user_node@LOCAL_HOSTNAME). A problem with the aforementioned discrepancy is that, if we just specify my_user_node, it will be expanded by the VM in my_user_node@hurricane.localdomain instead of my_user_node@hurricane.foobar.org, and that computing node will never be seen by the user node. |
Enabling The Distributed Mode Of Operation
A key point of scalability lies in the possibility of harnessing distributed resources.
Note
Should Sim-Diasca be run only locally (i.e. on the current computer), this section can be safely skipped.
In a distributed context, Sim-Diasca must be able to make use of the computing resources available in other networked hosts.
To do so, the Sim-Diasca agents must be already running - and thus be already installed - on each of the targeted hosts before a simulation relying on them is run.
Of course, the user could log on each of these hosts, and install then launch manually the agents needed, however this process would be quite cumbersome and could not scale up. Sim-Diasca can fully perform this deployment task on the user's behalf instead (installation and execution), if proper settings are used. Then it is sufficient either to list the candidate hosts that can be used, or to run the higher-level cluster scripts that we provide (for which the amount of processing resources required has just to be specified).
One has mainly to ensure that the network is correctly configured and that, with one's account, a SSH password-less login can be performed from the current computer to all targeted remote hosts, which are expected to already have an Erlang environment directly available.
From now on, the user node will designate the Erlang node from which the user will run the simulation (e.g. the one created when issuing a command like make my_simulation_run from the user shell). That Erlang node will never take part directly to the computing. However, depending on the simulation settings, the host this node runs on may or may not be used as a computing resource, thanks to the automatic creation of another (local, simulation-dedicated) computing node.
One can also refer to the distributed cheat sheet of the Sim-Diasca Technical Manual for further guidance.
Basic Network Configuration
Note
Sim-Diasca will check automatically all the points discussed in this section, whose purpose is only to inform the reader and to provide some guidelines, should a check determine that the network is not properly configured.
Interconnectivity
All hosts able to take part to a (distributed) simulation should be able to reach all other hosts thanks to the network.
To check that at least a basic interconnectivity is available, Sim-Diasca will ping all eligible hosts from the user host, and retain only the alive ones (i.e. hosts that cannot be ping'ed are deemed not available for the simulation) [18].
| [18] | Note however that we could imagine that the user host pings successfully h1 and h2, while h1 is still not able to communicate with h2. However such awkward network configuration issues seldom occur, and any non fully-meshed connectivity would be detected later, at simulation-time. |
Once this host interconnectivity is established, node interconnectivity is automatically checked further.
Name Resolving
Each computing host should, in terms of network, be correctly configured.
Notably, for an host whose fully qualified DNS name is expected to be hurricane.foobar.org, one should have indeed:
$ hostname
hurricane

$ hostname -f
hurricane.foobar.org
In the latter case, returned values such as localhost.localdomain or localhost mean that the host will not be able to take part to a networked simulation.
Usually this configuration can be fixed if having root permissions. The /etc/hosts file should indeed have a line similar to:
127.0.0.1 hurricane.foobar.org hurricane localhost.localdomain localhost
Note the order: the fully qualified DNS name (hurricane.foobar.org) should be the first entry listed after the 127.0.0.1 IP, otherwise the networked mode of operation of Erlang may not be activated.
Security
All nodes created by Sim-Diasca will be given the unique cookie forged (based in a custom-generated UUID) by the user node. So no two simulations can collide, even if the same case is run by the same user on the same set of computers.
Password-less Authentication
This can be done with SSH quite simply, without requiring specific permissions [19], but thanks to a proper configuration.
Let's suppose a user foobar on host host_a.foobar.org wants to set-up password-less connections to host_b.foobar.org (supposedly with the same username).
| [19] | Provided that the SSH server running on the target host allows it (see the PubkeyAuthentication yes entry in the /etc/ssh/sshd_config file); it is generally the case. |
foobar just has to generate, when logged on host_a.foobar.org, a key pair with:
foobar@host_a.foobar.org$ ssh-keygen -t rsa
Generating public/private rsa key pair.
Enter file in which to save the key (/home/foobar/.ssh/id_rsa):
Enter passphrase (empty for no passphrase):
Enter same passphrase again:
Your identification has been saved in /home/foobar/.ssh/id_rsa.
Your public key has been saved in /home/foobar/.ssh/id_rsa.pub.
The key fingerprint is: XX:XX:XX... foobar@host_a.foobar.org
It generates a private key (~/.ssh/id_rsa, which shall be kept as is) and a public one (~/.ssh/id_rsa.pub, which can be freely shared).
The user then just has to register that public key to host_b.foobar.org.
On GNU/Linux this can be done simply thanks to:
foobar@host_a.foobar.org$ ssh-copy-id -i \
   ~/.ssh/id_rsa.pub host_b.foobar.org
If the above command fails or is not available, then the following procedure should be used.
First the public key must be transferred to the remote host:
foobar@host_a.foobar.org$ scp ~/.ssh/id_rsa.pub \
  foobar@host_b.foobar.org:/home/foobar/.ssh/id_rsa-from-host_a.pub
Then it just has to be declared as authorised on that remote host, with the proper permissions:
foobar@host_b.foobar.org$ cat /home/foobar/.ssh/id_rsa-from-host_a.pub \
   >> /home/foobar/.ssh/authorized_keys
foobar@host_b.foobar.org$ chmod 600 /home/foobar/.ssh/authorized_keys
foobar@host_b.foobar.org$ chmod 700 /home/foobar/.ssh
Once either of the two approaches succeeded, with a basic proper configuration of the SSH server, the login to the remote host should be performed without needing a password:
foobar@host_a.foobar.org$ ssh host_b.foobar.org
last login: XXX
foobar@host_b.foobar.org$
Hint
Each time a computing host that has never been used previously is added, one should preferably attempt first to perform from the command line a connection from the user host to this new host, in order to ensure that no interactive acknowledgement is needed.
For example, following message could be prompted once (some measures have been taken to avoid it, though):
The authenticity of host 'Server (XXXXX)' can't be established. RSA key
fingerprint is YYYYY. Are you sure you want to continue connecting (yes/no)?
Just answer yes (once for all).
Note finally that when using multiple computing nodes, all nodes should be able to connect to all nodes. More precisely, the first constraint is actually that the host on which the deployment manager will be run (i.e. the user node) should be able to connect by SSH to all other hosts (to spawn the remote computing nodes).
Then, once the deployment phase is over, the load balancer may spawn a model instance on any of the computing nodes, and two model instances may interact (between them and with the various simulation services) regardless of their respective actual locations. Therefore a fully-meshed network connectivity (everyone to everyone) is needed.
Note also that, notably for the sake of homogeneity, if the host from which the user launched the simulation has been listed among the eligible computing hosts, then another node will be created on the same host (an additional computing node), rather than reusing that launching (user) node as a computing one. No SSH connection between these two local nodes will be attempted, they will be directly interconnected.
Finally, for an host named foo.bar.org, a simple test allows to check both the SSH configuration and the availability of an Erlang environment. One should just run for each of the computing host:
$ ssh -q foo.bar.org erl -eval \
   '"io:format( \"This host would use Erlang version ~s.~n\", \
   [erlang:system_info(otp_release)]), erlang:halt()."'

Eshell V7.3  (abort with ^G)
This host would use Erlang version 18.
In that case, this host should be able to take part to the simulation, provided the firewall policy does not prevent it [20].
| [20] | Note that Sim-Diasca provides a way of specifying a non-standard EPMD port and a range of allowed TCP ports (see FIREWALL_OPT in myriad/GNUmakevars.inc or, preferably, the firewall_restrictions field of the deployment_settings record). However the usual practice, and by far safest, is to avoid the use of specific firewall policies between internal hosts: there are already plenty of reasons for a distributed application to experience runtime issues, no need to add more potential problems. |
Note also that the Sim-Diasca host configuration file allows to specify which UNIX user should be used on which host (as one may use different logins on different hosts).
Managing the Simulator Codebase
In a distributed context, the proper code (software) must of course be available on each of the computing hosts, so that this host is able to run a part of the simulation.
However installing manually everything on each host would be soon strenuous, error-prone, and could happen many times (e.g. when fine-tuning some models).
With Sim-Diasca, the only prerequisite that must be available on a host before this host is able to take part to a simulation are:
- having a proper configuration of the computing host, as already described (notably regarding network and SSH)
- and having a proper Erlang environment available on that host (i.e. erl must be directly found on the shell after a non-interactive login), preferably installed once for all with the myriad/conf/install-erlang.sh script we provide, or installed globally on the mount point of a distributed filesystem (typically NFS)
Then Sim-Diasca is able to launch automatically the proper agents on each of the selected computing hosts, and to transfer and set up on that host not only the simulation models to be used (both their code and data), but also its own code and prerequisites as well (i.e. the myriad, wooper, traces and sim-diasca packages).
So Sim-Diasca provides an automatic deployment system for the full simulator.
Such a deployment is based on a deployment archive (a .sdar file, for Sim-Diasca archive - a compressed, binary file automatically sent over the network), which can be either prebuilt once and then just specified to each Sim-Diasca run, or that can be automatically built on the fly by Sim-Diasca, from the build tree it is run from on the user node (this latter case is the default one).
Miscellaneous
One should ensure that the /tmp directory is writable by the user on each computing node, and that sufficient free space is available.
Cleaning Up
Under some circumstances (e.g. a model-level failure encountered during a simulation), some pending nodes, created by the deployment manager, may linger on a computing host; this should not be an issue, as the next launching of Sim-Diasca will wipe them out.
To remove them manually, the Erlang Port Mapper Daemon can be used, just run on that host:
$ epmd -kill
Note that launched nodes are, except on some error cases, automatically cleaned up and shut down by Sim-Diasca on simulation termination.
Should a simulation crash prevent this removal, all pending nodes will stop by themselves after a time-out.
Additionally, each time a simulation is run, by default it will start by attempting to remove any still lingering node it would detect.
Finally, should a new simulation be started whereas such pending nodes are still alive (despite the counter-measures taken), the simulation will detect this abnormal situation (based on the run-specific UUID that is generated first), and will exclude the corresponding hosts from that run.
Testing Sim-Diasca
Several test cases that can be run to experiment with Sim-Diasca: when a class X is defined (in class_X.erl), it is recommended to add a corresponding unitary test case (in class_X_test.erl).
To run such a test, once Sim-Diasca has been successfully built, one just has to go to the directory where that test is defined, and to run make class_X_run: the Sim-Diasca Make system will take care of compiling this test if needed and run it with an appropriately-configured Erlang interpreter.
For example, if wanting to run a Sim-Diasca built-in soda-vending test:
$ cd mock-simulators/soda-test/src
$ make
$ make demo-batch
Your console should be filled by much text similar to:
$ make demo-batch

make[1]: Entering directory 'A_ROOT_DIR/mock-simulators/soda-test/src'
       Running unitary test soda_stochastic_integration_run (third form)
       from soda_stochastic_integration_test
Launching the Erlang VM in non-distributed mode.
Erlang/OTP 19 [erts-8.1] [source] [64-bit] [smp:8:8] [async-threads:128]
[hipe] [kernel-poll:true]

Eshell V8.1  (abort with ^G)

1>
Simulation instance identifier is '46672710'.
Simulation trace file is
'Soda_Stochastic_Integration_Test-by-dalton-46672710.traces';
no interactive supervision requested.

The single specified computing host is available, using corresponding
node: 'Sim-Diasca-Soda_Stochastic_Integration_Test-dalton-46672710-computing-node@foobar.org'.

Use cookie '315bf70c-b6f1-4ff2-be23-f85832c08c31' to connect to the
nodes (user or computing ones).

[...]

[Trace Aggregator] Aggregator deleted.
End of case soda_stochastic_integration_test
(case finished, interpreter halted)
make[1]: Leaving directory 'A_ROOT_DIR/mock-simulators/soda-test/src'
Congratulations, a full simulation case just ran successfully!
One may then go one step further and test also a non-batch, more graphical mode of operation by running:
$ make demo
Three windows should pop up [21]:
- a first Geeqie/Gqview window, displaying the two simulation results (two time series) as graphs (plots), representing the number over time of cans available in each of the two soda vending machines
- a second Geeqie/Gqview window, displaying the measures aggregated by the performance tracker (resource consumption, number of instance per node, etc.), if this service is enabled (true by default)
- a LogMX console, for the supervision of the distributed simulation traces (if traces are enabled, which is true by default)
| [21] | When running a test from the command line, simulation results are displayed, whereas when the same test is run as part of a test suite, its outputs are generated but not displayed, since it must be run in batch (i.e. silently). Note that how tests are run regarding their outputs is unrelated to the operation mode of the time manager (batch or interactive mode). |
When not useful any more, all windows can be safely closed. The end of the simulation session occurs when the trace supervision window is closed.
Should a problem arise, please have a look at the Sim-Diasca Troubleshooting section of the Sim-Diasca Technical Manual.
To further discover how Sim-Diasca works and can be used, the next steps could be to peer in the source code of tests and of classes, before playing around and adding some toy models.
Installing Sim-Diasca
This completely optional action (that is generally not needed) allows to install all Sim-Diasca related packages (i.e. the Myriad, WOOPER, etc. packages), and Sim-Diasca itself, out of the build tree.
To do so, one just has to execute, from the top source directory (the one that contains the top-level directories like sim-diasca, wooper, etc.):
$ make install
In this case everything will be installed in the default ~/Software directory, which will be created if not existing already.
The user can specify any other installation directory instead, by defining the INSTALLATION_PREFIX variable, like in:
$ make install INSTALLATION_PREFIX=/opt/my-simulator
In all cases, under the installation directory, all Sim-Diasca related packages will be properly installed, mostly according to the Erlang recommended practices (i.e. with a hierarchy based on standard nested directories like ebin, examples, include, src, test, etc.).
Credits
Special thanks to Randall Munroe who is the author of all the comic strips that enliven this documentation, and who kindly allowed their use in this material.
See his XKCD website for all information, including for all his delightful other strips.
Please React!
If you have information more detailed or more recent than those presented in this document, if you noticed errors, neglects or points insufficiently discussed, drop us a line! (for that, follow the Support guidelines).
Support
Bugs, questions, remarks, patches, requests for enhancements, etc. regarding the installation procedure are to be reported to the project interface (typically issues) or directly at the email address mentioned at the beginning of this document.
Ending Word
We hope that the installation went smooth!
Now is maybe a good time to run some examples found in the mock-simulators tree (located at the root of the Sim-Diasca clone) - typically a soda-test?